Monday, 13 December 2010

Ceci n'est ce pas une Haskell Monad Tutorial

With apologies to the great surrealist painter Magritte, this really isn't a Haskell Monad Tutorial (HMT), or is it?

If you are reading this, you are probably aware that the blogosphere is littered with HMTs. The progression usually goes like this:

A programmer...
  1. undertakes to learn Haskell, 
  2. struggles for some period of time with understanding Monads, 
  3. suddenly has that "ah-ha" moment, and 
  4. writes a tutorial (convinced that they can finally explain it to the beginner better than anyone else who has gone before could).
In my case, I choose to diverge from this pattern (slightly):

I...
  1. took it upon myself to learn Haskell
  2. struggled with Monads for some time
  3. kind of slowly and grudgingly eventually "got" monads, but not with any kind of dramatic "eureka!", more like a "oh... right... ok" kind of feeling (which was remarkably anti-climactic considering how much hair I'd pulled out over this), and 
  4. am writing not so much a tutorial as a: "Here's what I did to understand it. Hope it helps."
I am not going to talk about Monad laws, IO, or Maybe. I am not even going to try to concoct a flowery definition of what it is (like "contanier" or "computational context"). I am just going to give two examples, which I wrote, specificially with a view to clarifying my own understanding (as per the suggestion of Brian Beckman, see video link below).

If this helps you, great. I wrote this to help me, and it served that purpose. It's called "learn by doing" (practical, rather than theoretical). I therefore must also suggest that you try this yourself, rather than just expect to get it by reading this. I'm willing to concede that there are probably serious problems with these definitions, given that I am not a schooled Haskell programmer, and don't know a lot about the conventions that serious people follow.

I'd like to start by throwing down a few references which were helpful to me in my understanding:
Now, those folks really know what they're talking about. Look to them for a real education. But, if you still want to see my rudimentary examples, here they are...

The two examples I implemented: the identity monad (the simplest of all!), and the state monad (because I really wanted to understand this for a project that I'm working on). Implementing the identity monad really helped me, because it's just so simple, yet has all the necessary properties of a "real" monad. State was far more difficult, mainly because of the fact that the monad wraps a function, rather than a value (although we know that these are the same thing in Haskell!), but once I cracked this, it really did "all make sense."

The Identity Monad

First, we need a type and type constructor (by Haskell convention I will use the same expression for both, which for this example is "Id").

 newtype Id a = Id a deriving Show  

Note: the "deriving Show" bit is there just in case I want to print these to the console. It could have just been:

Then I'm going to need a function to extract the value from the "Id" thingy:

 runId :: Id a -> a  
 runId (Id x) = x  

Simple enough, so far?

Note: this could also have been acheived using Haskell's "record syntax" as follows (saving the trouble of writing the extra function):

 newtype Id a = Id { runId :: a } deriving Show  

Now, the Monad bit. Don't blink, or you might miss it!

 instance Monad Id where  
  return a = Id a  
  m >>= f = f (runId m)  

Identity monad... done!

I'm not going to explain this in any great detail. You've probably read about "return" and "bind (>>=)" elsewhere. In bind: "m" is the monadic value, "f" is a function (a -> mb) and the bit on the right of the equals just says "run f on the value inside of m."

Some functions that operate on Id thingies:

 idPlusBar :: Id String -> Id String  
 idPlusBar x = do  
  y <- x  
  z <- Id (y ++ "bar")  
  return z  

This function operates on Id Strings appends "bar" to the value.

Note: the function above could be written more simply as:

 idPlusBar x = Id $ (runId x) ++ "bar"  

but I included it in long form for illustration purposes.

Here are a couple that operate on Id Ints:

 idPlusTwo :: Id Int -> Id Int  
 idPlusTwo x = Id $ (runId x) + 2  
 idTimesThree :: Id Int -> Id Int  
 idTimesThree x = Id $ (runId x) * 3  
 idComposed :: Id Int -> Id Int  
 idComposed = idPlusTwo . idTimesThree  

Now, here's a function ("main" in this case, as I can run this from the command line), which uses HUnit (you'll need to "import Test.HUnit") to test some assumptions:

 main = do  
  putStrLn "running tests"  
  -- Id String tests  
  let x = Id "foo"  
  let test1 = TestCase $ assertEqual "String foo" "foo" $ runId x  
  let test2 = TestCase $ assertEqual "String foobar" "foobar" $ runId $ idPlusBar x  
  -- Id Int tests  
  let y = Id 3 :: Id Int  
  let test3 = TestCase $ assertEqual "Int 3" 3 $ runId y  
  let test4 = TestCase $ assertEqual "Int 5" 5 $ runId $ idPlusTwo y  
  let test5 = TestCase $ assertEqual "Int 11" 11 $ runId $ idComposed y  
  -- run tests  
  let tests = TestList [ TestLabel "foo" test1  
     ,TestLabel "foobar" test2  
     ,TestLabel "int 3" test3  
     ,TestLabel "int 5" test4  
     ,TestLabel "int + *" test5  
    ]  
  runTestTT tests  

So far, none of this is too challenging. You may have noticed that there's absolutely no point to any of it, however. That's OK! The idea was just to get used to wrapping stuff up and operating on it. The first version of "idPlusBar" is interesting because it illustrates how things work in "do-notation."

If you've got this monad loaded up into ghci, you can see this, too:

 *Main> let x = Id "foo"  
 *Main> x  
 Id "foo"  
 *Main> idPlusBar x  
 Id "foobar"  
 *Main> let f x = x >>= \a -> Id (a ++ "bar")  
 *Main> f x  
 Id "foobar"  

where "f" doesn't use "do", but rather "bind" directly.

Now, if you're still with me, we shall leave the tidy, simple world of identity, and enter the mysterious wonderment that is "state."

The first part of this excercise involved coming up with a super simple case where I needed to have a state parameter of some kind and a bunch of functions that depended on it. I elected to make the State an "Int" and the value the functions operate on a List of Ints. The key is that in order to be sequenced correctly the state would have to be passed from one function to the next. The functions use the state int to transform the lists, and to add complication (and make it easy to prove it's working properly) I will increment the state with each function that gets executed.

As you probably know, you can do it by "threading the state" and not using monads at all. Let's try that first:

 addS :: Int -> [Int] -> [Int]  
 addS s xs = map (+ s) xs  
 timesSminus1 :: Int -> [Int] -> [Int]  
 timesSminus1 s xs = map (* (s-1)) xs  
 addStimes2 :: Int -> [Int] -> [Int]  
 addStimes2 s xs = map (+ (s*2)) xs  

where s::Int is the 'state' and the list is the thing to be transformed

Now we can sequence these functions, and "manually" increment the state:

 allS :: Int -> [Int] -> [Int]  
 allS s xs = let as = addS s xs;  
   s' = s+1;  
   as' = timesSminus1 s' as;  
   s'' = s'+1;  
   in addStimes2 s'' as'  

It's already easy to see, even with this simple example, that this has the potential to become quite cumbersome. It's also obvious that the incrementing of the state is going to get awfully repetitive and should be abstracted in some way.

Enter the state monad...

 type S = Int  
 newtype St s a = St { runState :: S -> (S, a) }  
 instance Monad (St s) where  
  return value = St $ \state -> (state, value)  
  monadSt >>= func = St $ \state->let (state', value) = runState monadSt state  
      in runState (func value) (state'+1)  

Note: this is not a generic state monad, but one which works exclusively on Ints and increments the state with each function execution (in "bind").

Here are our functions again, using the monad:

 addS' :: [Int] -> St Int [Int]  
 addS' xs = St $ \state -> (state,map (+ state) xs)  
 timesSminus1' :: [Int] -> St Int [Int]  
 timesSminus1' xs = St $ \state -> (state,map (* (state-1)) xs)  
 addStimes2' :: [Int] -> St Int [Int]  
 addStimes2' xs = St $ \state -> (state,map (+ (state*2)) xs)  
 allS' :: [Int] -> St Int [Int]  
 allS' xs = do  
   as <- addS' xs  
   as' <- timesSminus1' as  
   as'' <- addStimes2' as'  
   return as''  

The last function in particular is quite clean compared to its non-monadic cousin.

Once again, we'll use HUnit to test some assumptions...

 main = do  
  putStrLn "running tests"  
  -- set up some values to use  
  let xs = [1,2,3]  
  let state1 = 3  
  let state2 = 4  
  let state3 = 5  
  -- threading state tests  
  let test1 = TestCase $ assertEqual "increment by s" [4,5,6] $ addS state1 xs  
  let test2 = TestCase $ assertEqual "times (s-1)" [3,6,9] $ timesSminus1 state2 xs  
  let test3 = TestCase $ assertEqual "increment by s*2" [11,12,13] $ addStimes2 state3 xs  
  -- put it together in allS  
  let test4 = TestCase $ assertEqual "the lot" [22,25,28] $ allS state1 xs  
  -- state monad tests  
  let test1' = TestCase $ assertEqual "m increment by s" [4,5,6] $ snd $ (runState $ addS' xs) state1  
  let test2' = TestCase $ assertEqual "m times (s-1)" [3,6,9] $ snd $ (runState $ timesSminus1' xs) state2  
  let test3' = TestCase $ assertEqual "m increment by s*2" [11,12,13] $ snd $ (runState $ addStimes2' xs) state3  
  -- monadic state passing in allS'  
  let test4' = TestCase $ assertEqual "m the lot" [22,25,28] $ snd $ (runState $ allS' xs) state1  
  -- run tests  
  let tests = TestList [ TestLabel "test1" test1  
     ,TestLabel "test2" test2  
     ,TestLabel "test3" test3  
     ,TestLabel "test4" test4  
     ,TestLabel "m test1'" test1'  
     ,TestLabel "m test2'" test2'  
     ,TestLabel "m test3'" test3'  
     ,TestLabel "m test4'" test4'  
     ]  
  runTestTT tests  

The real eye-opening thing here is that allS' doesn't take a state parameter at all. That's because allS' is returning a state monad (a function from state to state,value). So, we pass the state to the function (or value) which is returned by this function. This is the trick... and it is a little bit like magic!

So,

allS' takes the list ("xs") and returns the monad. runState extracts the function from the monad (\s -> (s,a)), and we pass the initial state to that. That in turn returns the state,value pair, so we take the "snd" value of the tuple.

This is it again:

 snd $ (runState $ allS' xs) state1  

Nice, huh?

So, our function doesn't have to mess around with state at all. It's all handled in the monad's bind function, including the incrementing of the state's value with each function call.

Once again, I would just add that the most striking thing in all this is its simplicity (a trait I've come to expect from Haskell). It seems that monads weren't that complicated after all.

Now, what are these Monad Transformer things?

Thursday, 9 September 2010

Automated Unit Testing with ScalaCheck

It just sounds like a great idea, doesn't it? Automated testing? Fantastic! I can see the tagline now: Say Goodbye to Technical Debt Forever!

Before I begin, let's establish what we're talking about: What do we really mean when we say automated testing? In this case, what I do not mean is "test automation". I'm not talking about running tests automatically, by, say, using Continuous Integration. I'm talking about test generation. Test generation means, if you've got a function that operates on a particular input, you specify a "property" (or several properties) about that function, and then "generators" will give you variations on the input data to test all the edge cases, etc., and tell you whether the property holds. You can use default generators for known datatypes, or define your own.

I've been interested in the idea of automated testing for some time, having come across QuickCheck (a Haskell library). Please see this quite interesting interview with John Hughes (one of QuickCheck's creators) on Functional Programming.

I don't know Haskell very well, and have done more with Scala to date, so I thought I'd have a look at ScalaCheck to satisfy my curiosity. The following represents a quick walk through of the basics of ScalaCheck.

Please note: I'm using Scala 2.7.7 and ScalaCheck 1.6, and I'll do all this via the interpreter.

So, on the command line...

 scala -cp scalacheck_2.7.7-1.6.jar  
 scala> import org.scalacheck.Prop  

Nice. I just generated a hundred tests. This TDD business is going to be a breeze! But what was really going on here?

"forAll" is a method of the Prop ("property") object that returns a Prop instance. The parameter in this case is a function which is implicitly converted into a Prop. That Prop's "check" method is called and the result of the property check is displayed.

What was the property under test? For any given two Ints, if they are added together, the result of that addition will be equal regardless of the order in which they are added.

Admittedly, not very interesting, but nonetheless, this example illustrates a number of things, not least of which is that ScalaCheck generated, by way of its default Int generator (or Gen), 100 tests which all passed.

Here's a longer way to write the same thing which may make some of this clear:

 scala> val f = (a:Int, b:Int) => a+b == b+a  
 f: (Int, Int) => Boolean =   
 scala> val p = Prop.forAll(f)  
 p: org.scalacheck.Prop = Prop  
 scala> p.check  
 + OK, passed 100 tests.  

Great.

And you can easily combine multiple properties. Let's say you have 3 Props (p1,p2,p3) the first two of which are correct and the last is not:

 scala> (p1 && p2).check  
 + OK, passed 100 tests.  
 scala> (p1 && p3).check  
 ! Falsified after 1 passed tests.  
 > ARG_0: T(8,true)  
 scala> (p1 || p3).check  
 + OK, passed 100 tests.  

Now, if you're like me, and you really want to know what's going on, note that it is possible to "collect" the data that is generated for the tests.

For example...

 scala> val p = Prop.forAll((a:Int,b:Int) => Prop.collect(a,b) { a+b==b+a })  
 p: org.scalacheck.Prop = Prop  

This is essentially the same thing, but notice the insertion of the call to "Prop.collect".

Now when we check it, we get this...

 scala> p.check  
 + OK, passed 100 tests.  
 > Collected test data:  
 4% (0,0)  
 1% (-22,38)  
 1% (4,13)  
 1% (50,30)  
 1% (-1,44)  
 1% (4,28)  
 1% (12,-16)  
 1% (-1,-16)  
 1% (-11,2147483647)  
 1% (72,-17)  
 1% (8,-1)  
 1% (-3,-77)  
 1% (-46,-19)  
 1% (-23,-1)  
 1% (-26,-22)  
 1% (-21,46)  
 1% (-48,48)  
 1% (1,-13)  
 1% (18,1)  
 1% (19,-1)  
 1% (34,-3)  
 1% (-1,-29)  
 1% (-58,-63)  
 1% (1,15)  
 1% (4,11)  
 1% (17,-22)  
 1% (-8,-8)  
 1% (3,-15)  
 1% (-9,-36)  
 1% (-92,78)  
 1% (28,-42)  
 1% (-18,0)  
 1% (3,1)  
 1% (4,2147483647)  
 1% (-2147483648,10)  
 1% (37,-2147483648)  
 1% (8,-2147483648)  
 1% (21,0)  
 1% (1,39)  
 1% (17,88)  
 1% (0,-48)  
 1% (38,-44)  
 1% (0,6)  
 1% (2147483647,29)  
 1% (-1,-24)  
 1% (-28,11)  
 1% (-4,46)  
 1% (28,-63)  
 1% (35,8)  
 1% (9,12)  
 1% (18,29)  
 1% (8,-18)  
 1% (-3,-1)  
 1% (0,14)  
 1% (47,1)  
 1% (4,3)  
 1% (-84,-7)  
 1% (13,31)  
 1% (-60,29)  
 1% (-41,-43)  
 1% (-75,67)  
 1% (-3,2)  
 1% (-73,-57)  
 1% (-10,-13)  
 1% (15,-3)  
 1% (2147483647,-25)  
 1% (8,0)  
 1% (-79,76)  
 1% (48,3)  
 1% (-5,9)  
 1% (4,0)  
 1% (-2147483648,8)  
 1% (43,-25)  
 1% (-46,54)  
 1% (-9,-2147483648)  
 1% (52,33)  
 1% (-10,4)  
 1% (36,-20)  
 1% (1,0)  
 1% (30,1)  
 1% (-2147483648,22)  
 1% (-27,-12)  
 1% (0,1)  
 1% (-58,2147483647)  
 1% (38,-27)  
 1% (-38,19)  
 1% (23,38)  
 1% (11,-15)  
 1% (-2147483648,17)  
 1% (-17,51)  
 1% (-36,-59)  
 1% (1,14)  
 1% (-3,-11)  
 1% (-31,29)  
 1% (-60,-44)  
 1% (2147483647,1)  
 1% (4,16)  

So, we can see what's at work behind ScalaCheck's default generator (Gen) for "Int". A lot of random numbers there. Edge cases, positive and negative, zero, etc. Thanks, ScalaCheck! You just saved me a lot of test writing!

Let's look at a couple of things you can do with "Gen".

First, there's a "choose" method to choose amongst options. Say, we only wanted to check our property with Ints between 1 and 100.

 scala> Prop.forAll(Gen.choose(1,100),Gen.choose(1,100))((a:Int,b:Int) => Prop.collect(a,b) { a+b==b+a }).check  
 + OK, passed 100 tests.  
 > Collected test data:  
 1% (32,48)  
 1% (80,30)  
 1% (26,31)  
 1% (15,91)  
 1% (39,3)  
 1% (12,68)  
 1% (93,71)  
 1% (8,22)  
 1% (44,58)  
 1% (4,73)  
 1% (76,96)  
 1% (30,98)  
 1% (55,100)  
 1% (76,28)  
 1% (93,13)  
 1% (46,47)  
 1% (78,56)  
 1% (77,30)  
 1% (69,17)  
 1% (29,81)  
 1% (11,39)  
 1% (40,3)  
 1% (17,56)  
 1% (2,81)  
 1% (31,2)  
 1% (42,7)  
 1% (47,22)  
 1% (48,17)  
 1% (79,33)  
 1% (48,40)  
 1% (52,83)  
 1% (95,50)  
 1% (63,30)  
 1% (21,96)  
 1% (29,30)  
 1% (72,33)  
 1% (70,56)  
 1% (24,79)  
 1% (68,16)  
 1% (89,7)  
 1% (82,21)  
 1% (13,35)  
 1% (73,88)  
 1% (99,25)  
 1% (79,8)  
 1% (52,84)  
 1% (92,32)  
 1% (90,77)  
 1% (88,60)  
 1% (51,4)  
 1% (32,93)  
 1% (62,90)  
 1% (9,14)  
 1% (40,36)  
 1% (78,80)  
 1% (84,5)  
 1% (31,63)  
 1% (7,14)  
 1% (48,88)  
 1% (92,21)  
 1% (31,52)  
 1% (58,2)  
 1% (69,82)  
 1% (84,7)  
 1% (19,69)  
 1% (48,94)  
 1% (50,16)  
 1% (59,52)  
 1% (63,63)  
 1% (55,40)  
 1% (50,39)  
 1% (30,26)  
 1% (15,61)  
 1% (85,30)  
 1% (93,90)  
 1% (19,49)  
 1% (5,61)  
 1% (28,56)  
 1% (41,60)  
 1% (88,82)  
 1% (40,62)  
 1% (96,48)  
 1% (85,96)  
 1% (88,7)  
 1% (1,91)  
 1% (14,82)  
 1% (1,56)  
 1% (24,98)  
 1% (86,41)  
 1% (77,65)  
 1% (4,38)  
 1% (78,77)  
 1% (4,62)  
 1% (84,36)  
 1% (90,33)  
 1% (12,67)  
 1% (45,45)  
 1% (54,75)  
 1% (38,94)  
 1% (14,91)  

Or, we can see that the range is inclusive.

Or, we can define a Gen which is based on conditional statements using "suchThat".

 val smallOdds = Gen.choose(1,100) suchThat (_ % 2 == 1)  
 smallOdds: org.scalacheck.Gen[Int] = Gen()  

And use that for both our Ints:

 scala> Prop.forAll(smallOdds,smallOdds)((a:Int,b:Int) => Prop.collect(a,b) { a+b==b+a }).check  
 + OK, passed 100 tests.  
 > Collected test data:  
 2% (19,75)  
 2% (53,55)  
 1% (35,47)  
 1% (15,75)  
 1% (13,41)  
 1% (51,99)  
 1% (39,23)  
 1% (97,35)  
 1% (47,99)  
 1% (79,87)  
 1% (95,55)  
 1% (45,49)  
 1% (3,61)  
 1% (73,93)  
 1% (13,5)  
 1% (45,45)  
 1% (31,51)  
 1% (61,9)  
 1% (55,55)  
 1% (25,47)  
 1% (99,21)  
 1% (65,29)  
 1% (47,49)  
 1% (47,89)  
 1% (95,39)  
 1% (43,73)  
 1% (39,49)  
 1% (41,17)  
 1% (89,25)  
 1% (25,39)  
 1% (37,27)  
 1% (17,49)  
 1% (77,37)  
 1% (11,9)  
 1% (15,13)  
 1% (37,47)  
 1% (93,77)  
 1% (5,75)  
 1% (19,87)  
 1% (35,39)  
 1% (3,21)  
 1% (65,53)  
 1% (73,83)  
 1% (39,63)  
 1% (31,53)  
 1% (69,31)  
 1% (99,65)  
 1% (9,97)  
 1% (55,57)  
 1% (83,71)  
 1% (41,35)  
 1% (59,69)  
 1% (3,55)  
 1% (85,9)  
 1% (87,71)  
 1% (33,33)  
 1% (9,83)  
 1% (59,55)  
 1% (19,51)  
 1% (49,45)  
 1% (95,61)  
 1% (45,21)  
 1% (57,61)  
 1% (87,89)  
 1% (35,71)  
 1% (85,89)  
 1% (61,91)  
 1% (47,5)  
 1% (3,69)  
 1% (3,17)  
 1% (39,85)  
 1% (95,89)  
 1% (87,11)  
 1% (85,49)  
 1% (55,79)  
 1% (7,97)  
 1% (93,29)  
 1% (37,61)  
 1% (51,19)  
 1% (67,53)  
 1% (71,9)  
 1% (57,11)  
 1% (41,85)  
 1% (31,27)  
 1% (31,57)  
 1% (87,49)  
 1% (69,53)  
 1% (59,77)  
 1% (23,87)  
 1% (29,21)  
 1% (11,59)  
 1% (69,69)  
 1% (77,79)  
 1% (85,65)  
 1% (31,31)  
 1% (97,15)  
 1% (11,15)  
 1% (75,85)  

Let's say you wanted to generate data for an arbitrary case class. ScalaCheck comes with an "Arbitrary" class to do just that:

 scala> case class T(a:Int, b:Boolean)  
 defined class T  
 scala>import org.scalacheck.Arbitrary  
 import org.scalacheck.Arbitrary  
 scala> val genT = for { a <- Gen.choose(1,10); b <- Arbitrary.arbitrary[Boolean] } yield T(a,b)  
 genT: org.scalacheck.Gen[T] = Gen()  

So, our class should be comprised of an Int value 1 to 10 (inclusive) and a boolean.

 scala> Prop.forAll(genT)((t:T) => Prop.collect(t) { t.a >= 1 && t.a <= 10 && (t.b == true || t.b == false) }).check  
 + OK, passed 100 tests.  
 > Collected test data:  
 9% T(3,true)  
 8% T(10,true)  
 7% T(6,false)  
 7% T(2,true)  
 6% T(4,false)  
 6% T(7,false)  
 6% T(2,false)  
 6% T(1,true)  
 6% T(4,true)  
 5% T(5,false)  
 5% T(8,true)  
 5% T(8,false)  
 5% T(3,false)  
 4% T(5,true)  
 4% T(7,true)  
 3% T(10,false)  
 3% T(1,false)  
 3% T(9,false)  
 1% T(9,true)  
 1% T(6,true)  

Lovely.

Another interesting feature is the ability to classify values that are chosen by the generator. For example...

 scala> Prop.forAll(genT)(t => Prop.classify({ t.b==true }, "b is true")(p)).check  
 + OK, passed 100 tests.  
 > Collected test data:  
 60% b is true  

Note: "p" is a property which holds in this case.

Labels:

Let's say you have three properties you are testing, and two of the three are correct...

 scala> val p1 = Prop.forAll(genT)((t:T) => t.a >= 1)  
 p1: org.scalacheck.Prop = Prop  
 scala> p1.check  
 + OK, passed 100 tests.  
 scala> val p2 = Prop.forAll(genT)((t:T) => t.a <= 10)  
 p2: org.scalacheck.Prop = Prop  
 scala> p2.check  
 + OK, passed 100 tests.  
 scala> val p3 = Prop.forAll(genT)((t:T) => t.b == false)  
 p3: org.scalacheck.Prop = Prop  
 scala> p3.check  
 ! Falsified after 2 passed tests.  
 > ARG_0: T(1,true)  

Run in combination, it's impossible to know which property failed:

 scala> (p1 && p2 && p3).check  
 ! Falsified after 0 passed tests.  
 > ARG_0: T(2,true)  

So, you can label the individual properties using a special ":|" operator:

 scala> (p1 :| "a greater than or equal to 1" && p2 :| "a less than or equal to 10" && p3 :| "b always false").check  
 ! Falsified after 0 passed tests.  
 > Labels of failing property:  
 b always false  
 > ARG_0: T(8,true)  

Lastly, another cool feature which is very "scala-ish": implicit generator definitions. Basically, ScalaCheck uses implicit definitions to decide which generator to use. By default, there are implicit generators for basic types (Int, String, etc., as seen above where no generator definition was necessary for Ints). However, here's how implicit def works for our case class (T):

 scala> implicit def arbT: Arbitrary[T] = Arbitrary(genT)  
 arbT: org.scalacheck.Arbitrary[T]  
 scala> Prop.forAll((t:T) => t.a >= 1).check      
 + OK, passed 100 tests.  

Don't blink or you'll miss the magic!

This is all gone into in much more detail in the ScalaCheck User Guide, but I hope this overview will prove helpful to some.

Saturday, 21 August 2010

Developing a Project Projection Chart in Excel When the Backlog Contains Sub-Projects (Agile/Scrum)

With the keyword being "Excel". (Oh, it's a particular beast, alright.)

Lest I be burned at the stake by a ferocious pack of Excelites, I begin with the following admission: I am a newbie when it comes to Excel. I write this blog partly to get constructive feedback (should anyone have any), and partly to help anyone who might struggle with a similar problem and who might receive some modicum of joy from this method.


The Probelm

First, let me define a problem: You have a backlog that contains work which is categorized in some way. The categories might be "sub-projects", "feature sets", or similar. You want to get a picture of when a particuar category is going to be worked on, or when work overall on a particuar category is going to be done. Furthermore, you don't just want to know, you want to be able to make a big, visible chart out of the data.

This excercise was in part inspired by this blog post: Is the Gantt Chart Useless in Agile Projects? written by Michael Cardus on Jurgen Appelo's Management 3.0 site. That post deals specifically with Gantt charts in Agile, and a Gantt chart wasn't exactly what we needed, but is quite similar. So the "literature", so to speak, on doing Gantt charts in Excel should prove useful.

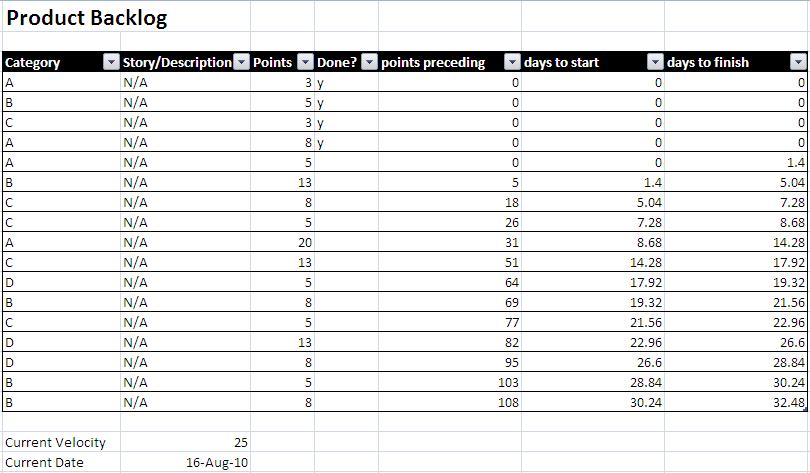
Let's say your backlog looks like this:


So, we have four categories with various stories which have been put in a completely random (uh, I mean very sensible and thought-out) order by the Product Owner. Each story has a size. We also (and maybe not everyone does this) keep old backlog items around and mark as "done", so we'll need to take that into consideration.

Let's also assume that using Excel is a requirement. Please don't question this requirement; I did, and my arse still hurts from the spanking.

The first thing I did when trying to "solve" this problem was to try a load of various ways of summarizing the data and visualizing it with built in Excel chart tools. Once I managed to reinsert all the hair that I had pulled out of my head (actually, there's still a spot on top which isn't covered and I'm pretty sure that wasn't there before ;-), I eventually settled on this method: Convert the story points to days based on velocity, calculate the work activity on a per day basis, then use a stacked bar chart to visualize.

Let's look at those steps individually:


Step 1: Points to Days

Now, I know what you're thinking: story points are not a measure of time! Yes, but that doesn't mean to say that we're not allowed to use our average (and worst case) velocity to make loose predictions for release planning purposes. Work with me here, I'm pretty sure I'm not violating some law of Scrum physics that's going to open up a hole in the Points/Time Continuum.

The way I did this conversion was to use a few hidden columns in the backlog to show "preceding points" for each story (i.e. story points up to this story in the backlog which were not yet complete), as well as "days before" and "days at completion" both based on velocity.

The formula for getting the preceding points was a bit tricky. To sum the "undone" work in the backlog that precedes this story:

{=SUM(IF(($E4<>"y")*($D4>0)*($E$4:$E$14<>"y")*(ROW($D$4:$D$14)<ROW()),$D$4:$D$14,0))}

Where D is the Points column, and E is the Done? column.

It's an array formula (a key fact: look up array formulas if you don't know about them, they're quite cool) that basically looks at the whole table to get points for stories where "Done?" is not "y" and the row number is less than the current row number. Looks easy in hindsight, doesn't it!

Note that the "*" is how we "AND" conditions in an array formula. Excel's "AND" function won't work here.

The next two calculations really are easy.

Calculate the number of days until this story will start (based on current velocity):

=($F4/($C$23/7))

Calculate the number of days until this work will be complete (based on current velocity and story size):

=IF($E4<>"y",($F4+$D4)/($C$23/7),0)

Where F is the "preceding points" column we calculted above, C23 is the average sprint velocity and 7 is the number of days per sprint.

Now, with those columns unhidden, the backlog looks like this:


So, with that chore out of the way, let's talk about what we want this graph to look like. I always find with Excel that it's easier to think about what data you need to create a workable chart first, and then format the data accordingly. It's too easy to disappear down a rabbit hole if you take what seems to be sensible data and try to make the chart fit *it*.

Ultimately, this is what we end up with (what we are going for):


The Gantt chart literature made it quite clear that a stacked bar chart would be our friend. I played around a bit with line charts and scatter plots, but nothing worked quite right. One thing that slightly bugs me about Excel is not being able to do a chart which is categorical on both axes. If that were possible then a mapping of our categories to a Sprint date (or Sprint number) would be relatively easy. I'm sure there's a mathematical reason for it (surely there's a reason for everything Microsoft does?), but Excel only supports value/value (scatter plot) and category/value (everything else).

Step 2: The Chart Data

Now this is where it gets ugly. How the hell are we going to get a chart that looks like that from our data? Turns out, it's pretty easy if we just stop thinking about it and lay the data out in the dumbest way we can think of! (I've always had this theory that computers are really, really dumb, and programmers are just people who are good at breaking stuff down into simple instructions that make sense to a dummy!)

Take a look at the picture below to see how this was done. Better yet, download the spreadsheet here.


Note: the pic doesn't show the whole thing. There is data for every day that we want to show (42 days, or 6 sprints of 7 days, in this case).

So, literally, there's a column for every day, and there's a cell for every category/day that has a 1 or 0 depending on whether there is work in that category for that day. The formula looks like this:

Determine if this Category on this Day contains work (show 1 or 0):

{=SUM(IF((Table1[category]=$U5)*(Table1[done?]<>"y")*(V$3>=Table1[days to start])*(V$3<Table1[days to finish]),1,0))}

Where U is the Category column, and V3 points to the day number of the current column.

So, basically, for all items in this category: is this day in between the start and finish day of these pieces of work?

The "1" actually creates the "height" for our bar in the graph. The trick here is the use of the inverse items (blanks) to fill in the vertical space below other categories. The "blanks" are just set to "No Fill" in the chart, so they are literally blanks.Figuring that one out was my proudest moment using Excel to date (OK, you caught me, I'm easily impressed).

A few other bits of trickery: eliminate gaps in bars so they look continuous; set horizontal axis major unit to 7 for sprint dates; delete left axis; delete "blanks" from legend; and we're done!

So, please download that spreadsheet and use this if you like it. Or, if you have a better idea, I'd love to hear it!

'Bye for now...

Tuesday, 8 June 2010

What's So Funny About ATDD, BDD, and Dependency Injection?

With apologies to Elvis Costello...

So, I've been thinking about a way to introduce the concepts of Acceptance Test Driven Development (ATDD) and Behavior Driven Development (BDD) to our developers. I'd also like to cover Dependency Injection as this seems to be something that comes up a lot when we discuss TDD in our little neck of the woods.

As an example, I've used an abstraction from a large project that we've been working on. The project is a data conversion project. I won't go into details, but the gist is this: take some data (probably from a database), perform some validation checks on it, filter stuff that we don't want, convert some stuff that we do want, and send it to some kind of output stream.

Our project is Java-based, but I've chosen to use Scala for this example for a number of reasons:
1. Scala seemed interesting, and I wanted to learn more.
2. Scala has parser combinators which is perfect to test my idea of using a DSL to define our conversion rules.
3. ScalaTest supports ATDD and BDD beautifully via its FeatureSpec and FlatSpec traits, respectively.
4. Scala has some neat ways of dealing with dependency injection (see Chapter 27 of the Odersky book).
5. Scala is fully interoperable with Java, so we can reuse any libraries or code from the existing project.

See Scala and ScalaTest here and here, respectively.

So, let's get started... (please bear in mind that I am well aware that my Scala code, being a relative newcomer to it, is likely to be a bit rough... I welcome suggestions!)

Firstly, I set up an ant build.xml that would compile my Scala code and run my ScalaTest tests. There are basically 3 files (not counting the build.xml): 1) test/UnitTests.scala, 2) test/AcceptanceTests.scala, and 3) src/Conversion.scala. It's a pretty small project for purposes of this exercise, so there's no need to get crazy here, plus it's nice to be able to easily ":load" files in the Scala interpreter (note: by the end it was just approaching large enough to warrant breaking some stuff out into more files, but I chose not to go there).

Note: the code for this project can be downloaded here. Please take a look. I am just going to focus this blog on a few of the more interesting points.

The application design was set up with the idea of ATDD in mind. There would be a Conversion class that would take all the necessary bits as parameters: those bits being the datasource, the rules for the conversions, and some kind of output stream device. So, let's look at some of the acceptance tests first.

The first thing to bear in mind was that I was going to need some kind of Data type for retrieving and carrying the input data. I knew that this might come from a database, but I wanted to be able to "inject" it for purposes of these tests. I decided to go with a simple Map[String,String] to capture field names and values. There would be an abstract class called "Data" and one called "DataSet" that I could implement to get my tests set up. The DataSet class would have a foreach method, so that rows could be read from a database one at a time for processing (rather than pass a whole set of data at once, as our datasets are quite large in reality).

Additionally, I would need "Rules". I figured that these would be read from a file, and would comprise our "DSL" bit, so I opted to have these be simple Strings. Again, an abstract class called RuleSet (List[String] for testing) would also have the potential for some other functionality, such as reading the Rules from a file.

I also used a static "Log" object to capture system output for monitoring. The default Log would just write to STDOUT, but I also implemented a version that would write to a list buffer, so that I could capture that stuff for testing, too.

Also, an Output class which I implemented as a ListBuffer as well for testing. In reality, this Output class could write to a database, or send data across the network, etc.

Lastly, a Conversion object which takes each of our little dependencies via its apply method, and does it's magic (basically apply all Rules to each Data object in the DataSet and capturing the output via our Output object).

Here's a snapshot of the acceptance tests...

 class RuleApiFeatureSpec extends FeatureSpec with GivenWhenThen with MustMatchers {  
  val d1 = MapData(Map(("id","1"),("a","5foo"),("b","1234bar234")))  
  val d2 = MapData(Map(("id","2"),("a","foo"),("b","bar45")))  
  val d3 = MapData(Map(("id","3"),("a","454foo45"),("b","445bar")))  
  val d4 = MapData(Map(("id","4"),("a","43foo45"),("b","bar87")))  
  val d5 = MapData(Map(("id","5"),("a","foo45"),("b","3bar4546")))  
  val d6 = MapData(Map(("id","6"),("a","cfoo"),("b","bar")))  
  object MapDataSet extends DataSet {  
  // in production, DataSet may come from a database (can be read one record at a time in foreach)  
  val data = List(d1,d2,d3,d4,d5,d6)  
    def foreach(f:(Data)=>Unit):Unit = { data.foreach(f) }  
  }  
  val r0 = "f:b /^[0-9][0-9]+.*/ Convert x:transformAandB" // convert a and b if b starts with two numbers  
  val r1 = "f:b /^[0-9]+.*/ Convert x:transformA" // convert a if b starts with a number  
  val r2 = "f:a /^[0-9]+.*/ Filter" // filter if a starts with a number  
  val r3 = "f:b /^b.*/ Convert x:transformB" // convert b if b starts with "b"  
  val r4 = "f:a /^c.*/ NoMatch" // bad rule  
  val rules = RuleList(List(r0,r1,r2,r3,r4),MyRuleParser)  
  class ListOut extends Output {  
    var container = new ListBuffer[Data]()  
    def apply(dataIn:Data) = {  
     container+dataIn  
    }  
  def getById(n:String):Data = { container.filter( (d) => d("id") == n )(0) } // assuming one match here  
    override def toString = "***OUTPUT***\n"+container.mkString("\n")  
  }  
  Log.setType("list")  
  feature("Conversion API"){  
  scenario("Filtered Output"){  
   given("The default testing scenario set up above")  
   when("I run the conversion")  
   val out = new ListOut  
   Conversion(MapDataSet,rules,out)  
   then("I expect to see five records in the output")  
   out.container must have length 5  
   then("The filtered record should be id 4")  
   out.container.map( d => d("id") ).contains("4") must be === false  
   then("The records not filtered would be 1,2,3,5,6")  
   out.container.map( d => d("id") ).sameElements(List("1","2","3","5","6")) must be === true  
  }  
  }  
 }  

So, this system is geared toward Acceptance Testing, via dependency injection. And ScalaTest's FeatureSpec is great for this. It even gives you a nice "Given When Then" syntax, so that your real world acceptance criteria can easily be translated into automated acceptance tests. You are writing acceptance criteria, aren't you!?!? ;-)

Other acceptance tests follow more or less the same pattern.

BTW, Here's the code for the Conversion object:

 object Conversion extends Logging {  
   def apply(data:DataSet, rules:RuleSet, output:Output) = {  
     data.foreach(  
       d => {  
         log("PRE PROCESSING: "+d)  
         val o = rules(d)  
         log("POST PROCESSING: "+o)  
         if(!o.isFiltered()) { log("ADDING TO OUTPUT: "+o); output(o); }  
       }  
     )  
   }  
 }  

The foreach method on the DataSet is called and the rules applied to each resulting object. So, by implementing a "DbDataSet", for example, these records could be pulled from a database.

I'll just show the RuleSet code, because I love this little Scala trick:

 case class RuleList(rs:List[String],rp:RuleParser) extends RuleSet with Logging {  
   val rules = rs.map { r => rp.parse(r) }.filter{ r => r != None }.map{ r => r.get }.toSeq  
   def apply(dataIn:Data):Data = {  
     log("APPLYING RULES")  
     Function.chain(rules)(dataIn)  
   }  
 }  

I suspect there might be a cleaner way to do that map/filter/map thing, but the cool thing is the line: Function.chain(rules)(dataIn). Basically, with the "rules" being implementations of Function[Data,Data], it's basically saying "apply this data object to this chain of Rule functions". Nice.

This line sets up the rules, and references the RuleParser:

 val rules = RuleList(List(r0,r1,r2,r3,r4),MyRuleParser)  

Here's the code for the RuleParser:

 object MyRuleParser extends RegexParsers with RuleParser {  
   def fieldStart:Parser[String] = "f:"  
   def field:Parser[String] = "[A-Za-z]+".r ^^ { _.toString }  
   def functionStart:Parser[String] = "x:"  
   def function:Parser[String] = "[A-Za-z]+".r ^^ { _.toString }  
   def pattern:Parser[Regex] = "/.*?/".r ^^ { case p => new Regex("/".r.replaceAllIn(p,"")) }  
   def action:Parser[String] = "Filter|Convert".r ^^ { _.toString }  
   def rule1:Parser[Rule] = fieldStart~field~pattern~action~functionStart~function ^^ { case fs~f~p~a~xs~x => Rule(new PatternMatcher(f,p),a,ConvertFuns.functions(x)) }  
   def rule2:Parser[Rule] = fieldStart~field~pattern~action ^^ { case fs~f~p~a => Rule(new PatternMatcher(f,p),a,NoConvert) }  
   def rule:Parser[Rule] = rule1 | rule2  
   def parse(input:String):Option[Rule] = parseAll(rule,input) match {  
     case Success(e,_) => Some(e)  
     case f: NoSuccess => None  
   }  
 }  

This uses parser combinators to turn our "Rule" (strings) into "Rule" objects. Rule itself looks like this:

 case class Rule(matcher:MatchFun, action:String, conversion:ConvertFun) extends Function[Data,Data] with Logging {  
   def apply(dataIn:Data):Data = {  
     log("RULE: "+this.action+" on data "+dataIn+":")  
  if(dataIn.isFiltered){ log("FILTERED"); dataIn }  
  else if(matcher(dataIn)){  
   action match {  
   case "Filter" => { log("FILTERING"); dataIn.setFiltered() }  
   case "Convert" => { log("CONVERTING"); conversion(dataIn) }  
   case _ => { log("BAD ACTION"); dataIn }  
   }  
  }  
  else{ log("NO MATCH"); dataIn }  
   }  
 }  

Now, I'd like to talk about unit tests.

For unit tests, I chose to use the FlatSpec trait in ScalaTest. The reason is because I wanted to do BDD, with the basic "Object when something should something in...{ code }" type syntax, but I really didn't like all the nesting that goes on in most libraries. Bill Venners has solved that problem for us with FlatSpec. The name is as it implies. Here are some examples...

 class MapDataSpec extends FlatSpec {  
  val m = MapData(Map(("id","1")))  
  "A MapData object with an 'id' field" should "have an 'id' key" in {  
  expect(true){ m.has("id") }  
  }  
  "A MapData object with an 'id' field with value '1'" should "return that value for that key" in {  
  expect("1"){ m("id") }  
  }  
  "A MapData object which has no 'a' field set" should "throw error when accessed" in {  
  expect(false){ m.has("a") }  
  intercept[NoSuchElementException]{ m("a") }  
  }  
  "A MapData object which has a field set" should "recognize that key and return that value for that key" in {  
  val m2 = m.set("a", "foo")  
  expect(true){ m2.has("a") }  
  expect("foo"){ m2("a") }  
  }  
  "A MapData object which has not had filtered set" should "return false for isFiltered" in {  
  expect(false){ m.isFiltered }  
  }  
  "A MapData object which has filtered set" should "return true for isFiltered" in {  
  val m2 = m.setFiltered  
  expect(true){ m2.isFiltered }  
  }  
 }  

And the unit tests continue on like that (please see linked code for details). Nice, simple syntax. Very intuitive.

I hope this makes some sense, and proves helpful to some.

Edit: BTW, I have found a slightly more elegant way of doing this:

 val rules = rs.map { r => rp.parse(r) }.filter{ r => r != None }.map{ r => r.get }.toSeq  

which is this:

 val rules = rs.map { r => rp.parse(r) }.flatMap{ x=>x }.toSeq  

Tuesday, 9 March 2010

On the Fence: API vs DSL for programming interactive music in the DOME


I've been working on an "online" version of the DOME, which is an interactive music engine for video games that I've been developing on and off for a number of years (for more info see Dometechnics). By "online" I mean a version of the engine that could be embedded in a web page, so that it could be made available for developers of Flash and Javascript games.
The engine itself is a Java applet, which is scriptable via Javascript. Java, for all its faults, is still the best platform for producing MIDI-based synthesized music in a web page. Thanks for nothin', Adobe. Keeping an eye on Google's NativeClient, though.
This blog post will take a look at the challenges of getting Javascript and Java to talk to one another in a web page, but mostly, I want to look at the design decisions that I've been making about the API for doing music programming and whether or not it would be more appropriate to call it a "DSL" (although the distinction might just be syntactic sugar).
In order to make sense of this post, I should explain a little bit about how the DOME works. It's based on the idea of creating a "score" in the sense of a theme and variations on that theme, followed perhaps by another theme. Loosely, it's designed to enable "cinema-like" scores in interactive contexts: "Films often have different themes for important characters, events, ideas or objects, taking the idea from Wagner's use of leitmotif. These may be played in different variations depending on the situation they represent, scattered amongst incidental music." (source Wikipedia).
It sort of looks like this (from Javascript):

 dome.setTheme( _JSON-formatted-theme-data_ );  
 dome.play();  
 var minor_variation = 'E-&gt;Eb,B-&gt;Bb|!bar:4'; // C major to C minor, but not in bar 4  
 dome.bind( _some-dom-element_, 'onclick', function(){ dome.vary(minor_variation) } );  

See how easy!?!
The interesting part in terms of this API vs DSL discussion is the line where the variation is defined. Because of limitations in passing anything other than strings or numbers from Javascript to Java, we might have ended up with something like this:

 dome.vary('pitch', '+', 5); // not a very attractive looking command to use (and operators as strings? ...bleh)  

Instead, we can do this:

 dome.vary('pitch+5'); // better. now it's like a mini-script (will require some parsing magic, though)  

...Great. (gratuitous Fast Show reference)
That's all well and good, but in fact, the API approach works better in certain situations. Namely when there's a lot of data to pass (for instance, when the initial theme is established), because an API call can just take a JSON-ified Javascript object as a string. That's because we can take advantage of existing libraries for parsing JSON. But having a DSL for creating variations, in this case, allows for the music programming to occur in a more natural-language type of way.
"The key point is that at each layer the API/DSL should allow the user ... to express the intent of what they want to do as easily as possible." (http://www.testdrivensoftware.com/?p=85)
As a side note, if you're the type of person who gets a kick out of making fun of DSL fan boys, I would direct you to chromatic's amusing discourse on the topic.
So, I've got an API to dump a Javascript object on Java and a DSL for scripting that object, once it's deserialized and appropriately instantiated in Java. In a sense this is still API, because it's essentially a function call on an object, passing in a string. There is no interpreter in the traditional sense of a scripting language. But because the string format for defining variations is a mini-language, it kind of becomes a DSL.
...Great.
Another option might have been to use Java 1.6's scripting API (javax.script), but I had made the decision early on that I wanted this system to be compatible with older versions of Java. I believe the difference is that with Java 1.6, one could theoretically write Javascript code and have that evaluated in the Java application (thereby allowing Javascript functions to manipulate the Java objects). It's a nice idea, but, not critical, and Java 1.5 (and previous) compatibility seemed more important. Why? Because at the time of this writing, the MIDI functionality in Java 1.6 on Mac OS X is broken... that's good enough for me!
Another fun point I'd like to make: At one point during the development of this API/DSL, I fell afoul of a little difference between scripting an applet via the Rhino shell and doing it in a web page. In Rhino, you can return a Java object to Javascript from a method in the applet, and pass that object back to the applet in another function call. Not so via LiveConnect!
For example:

 var applet = document.MyApplet;  
 var obj = applet.getSomeObject(); // return a Java object  
 applet.doSomethingWithObject(obj); // OK in Rhino! Will cause 40 days and nights of floods if you try this in a browser!  

So, one kind of work around, is to have Java use a method on the object to execute the relevant code. This could involve having to share state between the applet and the object in question.

 var applet = document.MyApplet;  
 var obj = applet.getSomeObject(); // return a Java object  
 obj.doSomethingWithMe(); // works OK in a browser  

...Great.

So, let's summarize: Embed the DOME in a web page as an applet and make it "scriptable" via Javascript, and support Java 1.5 for unbroken MIDI. With the goal being the ability to create a theme and define variations on that theme, and invoke those variations by binding them to Javascript events (hence making interactive music possible in Flash and Javascript based games). Done! Alright, not so much done, but it is a working prototype.
Because this is not really ready for prime time, I have produced the following screencast to demonstrate the ideas discussed in this blog. I am actively looking for development resource and industry contacts to bring this technology to fruition. Please come back to follow further progress.